POWERCLI – ENABLING OR DISABLING VAAI IN A VSPHERE CLUSTER [ATS HeartBeat]

There are limited cases where you would need to do this, but since I’m a huge proponent for scripting anything I do, here is a programmatic (and quick) way to enable or disable VAAI functionality for your vSphere clusters.

Why Disable VAAI?

The first thing you are asking of course, is why on earth would we do this? In vSphere 5.0, there is a bug affecting VAAI enabled systems that could cause a PSOD (Purple Screen of Death). The workaround for this is to upgrade to 5.1 where the problem no longer exists. There may be a patch for 5.0 which comes, but at this point it is still an outstanding issue.

For those of us who can’t jump to the next version at the moment, there is a simple way to disable the VAAI functions which will trigger the PSOD.

Disabling VAAI in the vSphere Client

This can be done in the vSphere Client also, but when you have larger clusters or multiple clusters it can get a little tedious (and error prone) to do this in the GUI. We access the VAAI attributes by opening up the Configuration tab for our host and selecting Advanced Settings:

vaai-advanced


Once you are in the Advanced Settings configuration dialog, select the DataMover option in the left hand pane and you will see the two fields in the main window that are HardwareAcceleratedMove and DataMover.HardwareAcceleratedInit:

vaai-settingspage

The option are 0 for disabled or 1 for enabled. One more setting to configure under the VMFS3 option which is VMFS3.HardwareAcceleratedLocking:

vaai-settingspage2

*NOTE*: the settings take effect immediately and do not require a reboot of the host. As soon as you close your Advanced Settings window you will see the task in your vSphere client window.

As I’ve mentioned, this isn’t terribly difficult, but we may have numerous hosts, and maybe even numerous clusters to manage so that is where the magic of PowerCLI comes in.

Script all the things!

My script is simple, and does the following:

  1. Check the current value of the settings for all hosts in the cluster (replace YourClusterName in the script)
  2. Change the properties to be 0 for disabled
  3. Check the current value of the three settings to confirm the new results


Here is the script in text format for easier copy and paste. Hope it’s helpful!

# First let’s see the current setting to ensure it is set to 1 (enabled) 

$advSettings =
“DataMover.HardwareAcceleratedMove”,”DataMover.HardwareAcceleratedInit”,”VMFS3.HardwareAcceleratedLocking”

Get-VMHost * |
Get-AdvancedSetting -Name $advSettings |
Select Entity,Name,Value |
Export-Csv report.csv -NoTypeInformation -UseCulture

Note:- Save in .PS1 format and run with PowerCLI

# Now we disable the three options by setting the value to 0 

$clusterName = “MyCluster”

Get-Cluster -Name $clusterName | Get-VMHost | %{
Get-AdvancedSetting -VMHost $_ -Name DataMover.HardwareAcceleratedMove | Set-AdvancedSetting -Value 0 -Confirm:$false
Get-AdvancedSetting -VMHost $_ -Name DataMover.HardwareAcceleratedInit | Set-AdvancedSetting -Value 0 -Confirm:$false
Get-AdvancedSetting -VMHost $_ -Name VMFS3.HardwareAcceleratedLocking | Set-AdvancedSetting -Value 0 -Confirm:$false

}

Note:- Save in .PS1 format and run with PowerCLI

# Confirm the results by querying the values which will show 0 now (disabled)

$advSettings =
“DataMover.HardwareAcceleratedMove”,”DataMover.HardwareAcceleratedInit”,”VMFS3.HardwareAcceleratedLocking”

Get-VMHost * |
Get-AdvancedSetting -Name $advSettings |
Select Entity,Name,Value |
Export-Csv report.csv -NoTypeInformation -UseCulture

Note:- Save in .PS1 format and run with PowerCLI

Happy Scripting!

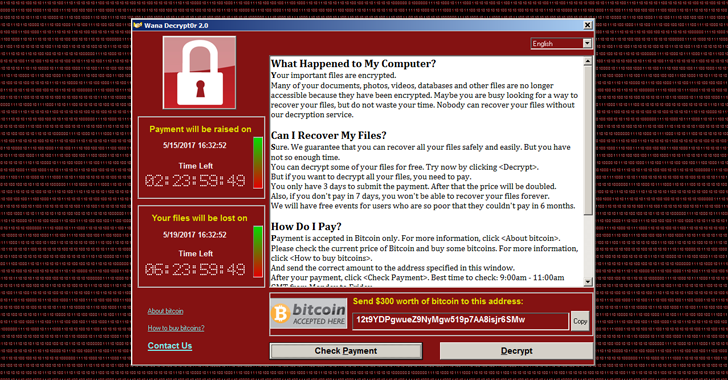
Wanna Cry Ransomware

Applies to Windows Security 

A type of virus that infect computers, and then prevent the user from accessing the operating system, or encrypts all the data stored on the computer,

The user asks the ransom to pay a fixed amount of money, as opposed to decrypting files or allowing access again to the operating system.

Wanna Cry Ransomware Guidelines:

Be careful to click on harmful links in your emails.

Be wary of visiting unsafe or unreliable sites.

Never click on a link that you do not trust on a web page or access to Facebook or messaging applications such as WatSab and other applications.

If you receive a message from your friend with a link, ask him before opening the link to confirm, (infected machines send random messages with links).

Keep your files backed up regularly and periodically.

Be aware of fraudulent e-mail messages that use names similar to popular services such as PayePal instead of PayPal or use popular service names without commas or excessive characters.

use anti virus andAlways be updated.

use Windows Update to update windows to close the gap.

I hope its useful. 

DCLI

​http://blogs.vmware.com/vsphere/2016/12/getting-started-datacenter-cli.html

Datacenter Command-Line Interface (DCLI) is one of vSphere’s newest CLIs. DCLI works exclusively with the vSphere Automation API (REST API for vSphere) to provide both an interactive and scriptable mode to monitor and manage all features made available to the REST based API.

With the vSphere 6.5 release, DCLI has picked up a ton of new functionalities! DCLI can now interact with the vCenter Server Appliance (VCSA), perform VM tasks, receive environmental vSphere information, managing vSphere Tags, and work with the Content Library. This is definitely a great tool to have in the toolbox for anyone accessing a vSphere environment.

Accessing DCLI

DCLI is able to be installed on a multitude of Windows and Linux systems as part of the vSphere Command-Line Interface (vCLI). DCLI is also automatically included within the vCenter Server Appliance (VCSA) as well as being included as part of the installation process for vCenter Server on Windows.

Using DCLI

There are two ways to use DCLI, either in an interactive shell or via scripting mode. Both methods have their benefits, so it comes down to either preference or what fits the use case at the time.

Interactive Shell

DCLI’s interactive shell has several great features, such as tab complete and session history retention and the ability to find a namespace just by starting it off with the first few characters.

Accessing DCLI’s Interactive Shell

Here’s an example workflow of using DCLI’s interactive shell:

  • Start DCLI with the following options (Note: options start with a + in DCLI)
    • +server -> The vCenter name/IP to connect to
    • +skip-server-verification -> Instruct DCLI to ignore any certificate warnings
    • +interactive -> Start the interactive mode

Once in the interactive shell, you can either hit tab and see the namespaces available or start typing in the name of the object you’d like to begin viewing or working with.

The example below shows a tab complete example when working with VM objects:
Showing Off DCLI's Tab Complete Functionality

Here’s an example on retrieving the VCSA’s system version and then how the session history works:
Showing off DCLI's history functionality

As seen above, just by typing in the first letter of a prior command allows the user to recall that command without having to type the entire line. The history will persist through sessions as well, making this a very nice feature!

Scripting Mode

The scripting mode allows DCLI commands to be used within scripts. These scripts can then be turned into more extensive workflows and/or scheduled tasks.

Calling DCLI commands through the scripting mode is fairly similar to interactive mode, but a server has to be specified each time. The full namespace has to be referenced as well.

Here’s an example of retrieving the VCSA’s system version and then retrieving a list of VMs:
Using DCLI's scripted mode to show a list of VMs
Here is an example of a bash script to create 10 VMs on a given datastore, resource-pool and folder:

1

2

3

4

5

6

7

8

9

10

11

12

13

#!/bin/bash

COUNTER=0

while [ $COUNTER lt 10 ]; do

echo Creating LoopVM$COUNTER

dcli com vmware vcenter vm create name LoopVM$COUNTER guest “SLES_12_64” resourcepool “resgroup-9” folder “group-v7” datastore “datastore-12”

let COUNTER=COUNTER+1

done


bold=$(tput bold)

normal=$(tput sgr0)


echo ${bold} VM List ${normal}

dcli com vmware vcenter vm list


Output Formatting

DCLI also has the ability to change how the output from commands are handled. The formatter allows users to specify outputs of CSV, HTML, JSON, Simple, Table, or XML.

Here’s an example of using the formatter by showing a list of the hosts and then specifying the “+formatter json” parameter to receive the same output in JSON:
Formatting the output of the ESXi hosts in JSON

Credential Store

One of the other big capabilities of DCLI is storing credentials with the Credential Store. This streamlines the process of connecting to the same vCenter repeatedly, and even more so when working in scripting mode.

The first time a user connects to a vCenter server, they will be prompted to store the credentials to the credstore. After that initial save, the credstore will be referenced with each connection to that server. If needed, credentials can be specified at the command line to over-ride the values stored in the credstore.

Users can also work with the credstore to either populate credentials with the “+credstore-add +username user” parameter, remove credentials with the “+credstore-remove +user user +server servername.fqdn”, and list what credentials already exist with the “+credstore-list” parameter.

Here’s an example output from using the “+credstore-list” parameter within an interactive mode session:
Retrieving a list of credentials from DCLI's credstore

Demonstration

Here’s a demonstration video showing DCLI’s interactive mode in action! The video details connecting to a VCSA, entering DCLI’s interactive mode, displaying some general environmental information as well as pointing out some of the benefits when using interactive mode, and lastly it creates a VM and shows all the important information about that new VM.

Pay close attention to that VM creation command, there’s a sneak peak of an upcoming post in this series on DCLI.

Conclusion

DCLI has, relatively, flown under the radar up until this point. Interactive mode allows even brand new users to easily access and run commands within moments of connecting and without knowin the name of the name spaces or reading documentation. Scripting mode lets users have those same great commands available outside of the interactive shell and utilize them in a standalone basis or within a scheduled task or cron job. These commands can easily be used with the formatter option to produce a variety of outputs and allow quick integration into other products.

DCLI is a great and intuitive CLI that should be added to anyone’s toolbox!

For more information on getting started with DCLI, see the DCLI Reference.

VMware ESXi updates address a cross-site scripting issue

VMSA-2016-0023

VMware ESXi updates address a cross-site scripting issue

VMware Security AdvisoryAdvisory ID:

VMSA-2016-0023

VMware Security AdvisorySeverity:

Important

VMware Security AdvisorySynopsis:

VMware ESXi updates address a cross-site scripting issue

VMware Security AdvisoryIssue date:

2016-12-20

VMware Security AdvisoryUpdated on:

2016-12-20 (Initial Advisory)

VMware Security AdvisoryCVE numbers:

CVE-2016-7463

 
1. Summary

   VMware ESXi updates address a cross-site scripting issue

2. Relevant Products
  • VMware vSphere Hypervisor (ESXi)
3. Problem Description

a. Host Client stored cross-site scripting issue


The ESXi Host Client contains a vulnerability that may allow for stored cross-site scripting (XSS). The issue can be introduced by an attacker that has permission to manage virtual machines through ESXi Host Client or by tricking the vSphere administrator to import a specially crafted VM. The issue may be triggered on the system from where ESXi Host Client is used to manage the specially crafted VM.


VMware advises not to import VMs from untrusted sources.
 

VMware would like to thank Caleb Watt (@calebwatt15) for reporting this issue to us.  


The Common Vulnerabilities and Exposures project (cve.mitre.org) has assigned the identifier CVE-2016-7463 to this issue.

Column 5 of the following table lists the action required to remediate the vulnerability in each release, if a solution is available.

VMware ProductESXi

Product Version6.5

Running onESXi

SeverityN/A

Replace with/ Apply Patchnot affected

Mitigation/ WorkaroundN/A

VMware ProductESXi

Product Version6.0

Running onESXi

SeverityImportant

Replace with/ Apply PatchESXi600-201611102-SG

Mitigation/ WorkaroundNone

VMware ProductESXi

Product Version5.5

Running onESXi

SeverityImportant

Replace with/ Apply PatchESXi550-201612102-SG

Mitigation/ WorkaroundNone


*The fling version which resolves this issue is 1.13.0.
 

4. Solution


Please review the patch/release notes for your product and version and verify the checksum of your downloaded file.

ESXi 6.0   

Downloads: 

https://www.vmware.com/patchmgr/findPatch.portal

Documentation:   

http://kb.vmware.com/kb/2145815 

ESXi 5.5   

Downloads: 

https://www.vmware.com/patchmgr/findPatch.portal

Documentation:   

http://kb.vmware.com/kb/2148194

5. References

http://cve.mitre.org/cgi-bin/cvename.cgi?name=CVE-2016-7463

6. Change log


2016-12-20 VMSA-2016-0023
Initial security advisory in conjunction with the release of VMware ESXi 5.5 patches on 2016-12-20.

7. Contact


E-mail list for product security notifications and announcements:

http://lists.vmware.com/cgi-bin/mailman/listinfo/security-announce


This Security Advisory is posted to the following lists:

security-announce@lists.vmware.com

bugtraq@securityfocus.com

fulldisclosure@seclists.org


E-mail: security@vmware.com

PGP key at:

https://kb.vmware.com/kb/1055


VMware Security Advisories

http://www.vmware.com/security/advisories


VMware Security Response Policy

https://www.vmware.com/support/policies/security_response.html


VMware Lifecycle Support Phases

https://www.vmware.com/support/policies/lifecycle.html


Twitter

https://twitter.com/VMwareSRC


Copyright 2016 VMware Inc. All rights reserved.

VMWARE COMMONLY USED TERMS

ESX  – Elastic Sky X ( i – integrated) 

GSX – Ground Storm X or Ground Swell X

FDM – Fault Domain Manager

CSI – Clustering Services Infrastructure

PAE – Propero Application Environment

VPX – Virtual Provisioning X

VPXA – Virtual Provisioning X Agent

VPXD – Virtual Provisioning X Daemon

VMX – Virtual Machine eXecutable

AAM – Automated Availability Manager

VIX – Virtual Infrastructure eXtension

VIM – Virtual Infrastructure Management

DAS – Distributed Availability Service

ccagent – Control Center agent

DPM  –  Distributed Power Management

DRS  –   Distributed Resources Scheduler

DVS   –    Distributed Virtual Switch

VDS   –   vNetwork Distributed Switch
ERS    –    Enterprise Ready Server

EUC   – End User Computing

EVC    –  Enhanced vMotion Compatibility

EVDC   – Elastic Virtual Data Center

HA     –  High Availability

HCL   –  Hardware Compatibility List

HoL    –  Hands-On Labs

IaaS    –  Infrastructure as a Service

SaaS   –   Software as a Service

SDDC   – Software Defined Data Center

SDRS   – Storage Distributed Resource Scheduling

SRM   –  Site Recovery Manager

STS   –  SpringSource Tool Suite

TAM   –  Technical Account Manager

V2V   –  Virtual to Virtual

VAAI   –  vStorage API for Array Integration

VADM  –  vCenter Application Discovery Manager

VDC   –  Virtual Data Center

VDP   –  vSphere Data Protection

VDR  –  VMware Data Recovery

VM   –  Virtual Machine

VMA   –  vSphere Management Assistant

VMFS  –  Virtual Machine File System

VMRC  –  VMware Remote Console

VMS   –  vFabric Management Service

VMSA  – VMware Security Advisory

VMTN  – VMware Technology Network

VMW   – VMware

VR   –  vSphere Replication

VRM   – vCloud Request Manager

VSA   – vSphere Storage Appliance

VSM   – VMware Service Manager

VSP   – VMware Sales Professional

vswif   – Virtual Switch Interface

May 2016 VMware FW and Software Recipe


VMware 2016 Recipe + HP

A Customer Notice will be released to notify customers of a newly published Recipe document. To sign up to receive Customer Notice notifications
please see the instructions below:
  • Go to http://www.hpe.com/info/myadvisory
  • In the “Choose a product category” Search for ”VMware vSphere Software”
  • In the search results , select ” VMware vSphere Software”
  • Select “Add select products”

Important Support Notes

This document specifies the versions of firmware, and software that are recommended for use with VMware
vSphere 5.x
and VMware vSphere 6.0 OS releases in conjunction with the HP Service Pack for ProLiant (SPP) 2016.04.0. The firmware versions and software versions listed in this Document have been tested as a solution set using this SPP as a baseline, and are fully supported by HPE.

Review the SPP Support Statement document on http://www.hpe.com/servers/spp/documentation to understand the support policy for SPP releases. When posted, the
SPP will contain the firmware and drivers specified in this document. The specified drivers are also included in the VMware base image or HPE Custom image, vailable from VMware.com or available on HPE’s vibsdepot(5.0 and 5.1 and 5.5/6.0) for this release. The specified system management software is included in the HPE
Custom Image, available from hp.com or available on HPE’s vibsdepot(5.0 and 5.1 and 5.5/6.0) for this release. It is recommended that users revisit the download site for this document to check for updates periodically. Review the SPP Contents Report on
http://www.hpe.com/servers/spp/documentation to see which firmware and driver components are included in the SPP.
VMware vSphere 6.0 Update 2, VMware vSphere 5.5 Update 3, and VMware vSphere 5.1 Update 3 are the VMware Releases that have been tested against this entire SPP.

Note: The April 2016 HPE Custom Images and the April VMware FW and Software Recipe version 20.2 now support AMD 6300 series processor based servers. This support is available with ROM version 2016.03.07


VMware ESXi

VMware ESXi
——————–

VMware ESXi (formerly ESX) is an enterprise-class, type-1 hypervisor developed by VMware for deploying and serving virtual computers. As a type-1 hypervisor, ESXi is not a software application that one installs in an operating system (OS); instead, it includes and integrates vital OS components, such as a kernel.

After version 4.1 (released in 2010), VMware renamed ESX to ESXi. ESXi replaces Service Console (a rudimentary operating system) with a more closely-integrated OS. ESX/ESXi is the primary component in the VMware Infrastructure software suite.

The name ESX originated as an abbreviation of Elastic Sky X.